Mastering Vectorization From Artwork Image to Scalable Creations
5 min read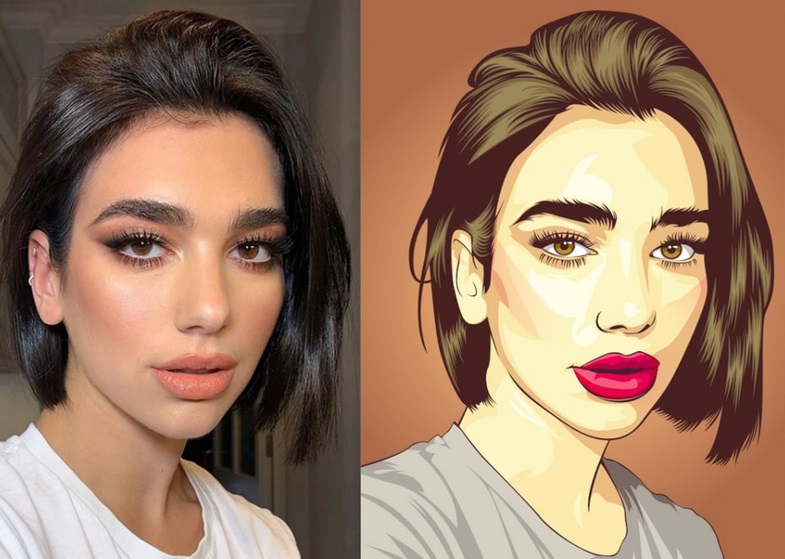
I’d like to share my experience with creating vector images from existing artwork. It’s a straightforward process that involves a few handy tools. To start, you’ll need to formulate a suitable prompt. Simplicity is key here; while you don’t have to use specific words, aiming for a simple and cartoony description makes the conversion to a vector image much smoother. Otherwise, you might need to do some extra editing later on.
When crafting your prompt, consider using terms like “Vector logo” or “vector art” to clarify the image’s nature. Once you enter your prompt, you’ll receive results that are often cartoony and vibrant. Choose the one that suits your needs best and upscale it if necessary. Once you have the image, save it to import it into your preferred design program.
Now, let’s talk about vectorizing in Adobe Illustrator. Some designers prefer this software, and it’s worth comparing the process to the free tool I’ll discuss later. In Illustrator, you can import your image via “File > Place.” To vectorize, go to “Object > Image Trace.” By default, it may turn your image black and white, but there are various presets to choose from. For color images, you’ll want to find the right preset; I recommend “Low Fidelity logo” for a good starting point.
 However, don’t hesitate to fine-tune the settings to achieve the desired result. You can adjust the number of paths, corners, and color accuracy. Once you’re satisfied, click “Expand,” and you’ll have a vector object ready for editing. While it may not be perfect, it’s a decent starting point, considering it takes just a few minutes.
Now, let’s explore a free alternative: Vectorizer.ai. This online tool is currently in beta and offers a straightforward way to convert images to SVG format. Upload your image, and it will process and convert it using AI, providing both an original and vectorized result. The quality is impressive, even when compared to Illustrator’s tracing feature. Download the vectorized image for further editing.
Comparing the results from the two methods, Vectorize.ai often does a better job, particularly in retaining fine details. However, personal preference and the complexity of your image may influence your choice.
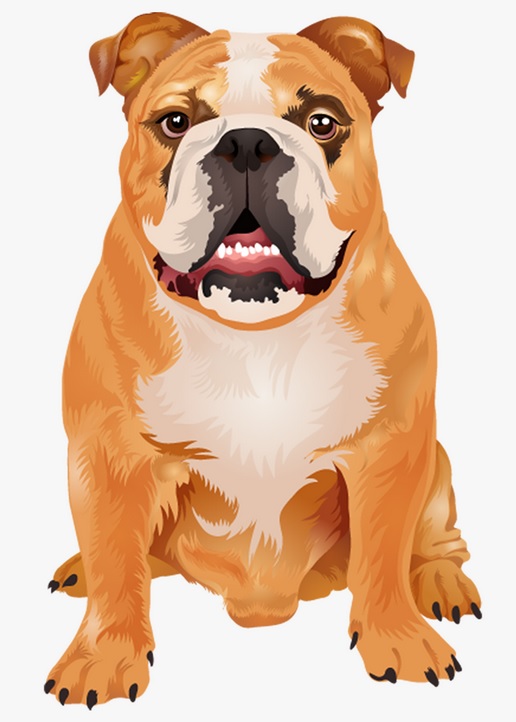
Vectorize.ai excels with highly detailed images, such as those featuring intricate patterns or textures. It maintains the quality and sharpness of these elements, making it a powerful tool for various projects.
However, Vectorize.ai may struggle with images that have subtle gradients or fades. Auto-tracing tools like this one find it challenging to replicate gradient effects accurately. You might need to manually add gradients if that’s an essential aspect of your artwork.
For instance, when dealing with a more complicated image, like one featuring intricate details such as sunglasses, fur, or whiskers, Vectorize.ai impresses with its ability to capture fine elements. It generates high-resolution vectors that faithfully represent the original artwork. However, keep in mind that smoothing out complex images with multiple objects can still be a manual task.
Moving on to images with flat colors and intricate details, Vectorize.ai continues to demonstrate its strength. It adeptly handles the details, ensuring that the final vector retains the nuances of the original design. This makes it an excellent choice for preserving the complexity of such artworks.
However, when it comes to images with subtle fades and gradients, Vectorize.ai faces some challenges. Auto-tracing tools struggle with accurately replicating gradient effects. As a result, these areas may appear solid in the vectorized version. Nevertheless, you have the flexibility to edit and add gradients manually after vectorization.
Lastly, in the case of anime-style images with fading colors, Vectorize.ai may not perform as well due to the difficulty of automatically recognizing and replicating gradients, so you can find ready made vectors at svg freak search through thousands of styles and colors. While it might not capture the fades perfectly, the overall vectorized image can still be a solid starting point for further editing.
To sum it up, Vectorize.ai proves to be a valuable tool for converting a wide range of artwork into vectors. It excels with highly detailed and complex designs, retaining their intricacies. However, it may require some manual adjustments for images with gradients or fades. Remember that this tool provides the flexibility to fine-tune your vectors after the initial conversion.
Now, let’s discuss some additional tips and considerations when working with vectorization, no matter which method you choose.
- Image Complexity: As you’ve seen, the success of vectorization can depend on the complexity of the image. For intricate designs, it’s essential to be patient and prepared for some manual tweaking. Simpler images tend to yield better results with minimal effort.
- Color Adjustments: After vectorization, you can easily edit the colors of your vector image. This is particularly useful if you want to experiment with different color schemes or match your artwork to specific branding requirements.
- Scale Flexibility: One of the primary advantages of vector images is their scalability. You can resize them without losing quality, making them ideal for various applications, from small icons to large banners.
- Layer Organization: When working with vector graphics in design software like Adobe Illustrator, consider organizing your artwork into layers. This allows for easier manipulation and editing of specific elements.
- File Formats: Depending on your project, you might need different file formats. Vector images are commonly saved in formats like SVG (Scalable Vector Graphics), AI (Adobe Illustrator), or EPS (Encapsulated PostScript). Be aware of the format requirements for your intended use.
- Be Mindful of Licensing: If you’re vectorizing existing artwork or images, be sure you have the appropriate rights or licenses to do so. Respect copyright and licensing agreements.
- Trial and Error: Vectorization can sometimes be an iterative process. Don’t be afraid to experiment, undo changes, and try different settings or tools to achieve the desired result.
- Vector Cleanup: After vectorization, it’s common to perform some manual cleanup. This may involve simplifying complex paths, adjusting curves, or removing unwanted details.
- Typography Considerations: If your artwork includes text, remember that vectorization may not always preserve fonts perfectly. You may need to re-create or adjust text elements manually.
- Practice Makes Perfect: Vectorization can be an art in itself. The more you practice and experiment, the better you’ll become at producing high-quality vector images efficiently.
The ability to create vector images from existing artwork opens up a world of creative possibilities. Whether you opt for Vectorize.ai, Adobe Illustrator, or other vectorization tools, understanding their strengths and limitations will help you make informed choices in your design projects.
Thank you for exploring this fascinating aspect of graphic design with me. I hope these insights and tips serve you well in your creative endeavors. If you have any more questions or need further guidance, please feel free to ask!